How to collaborate with your cofounder on Git and Github when building your Rails app
Common Git/Github hurdles so you can skip the frustration and jump straight to the benefits

Git/Github are intimidating, especially if you’re new to programming, but they are too powerful for you to ignore. If you’re new to programming, you may not have even heard of them because no one outside of the programming industry uses it. But inside, it is ubiquitous - every software team uses it for collaboration.
So, if you’re working with your cofounder to build an MVP, you should be using it. Even from an early stage, it can boost your speed of collaboration and make it possible to work on the codebase together.
If you’re completely new to Git, I love this desktop app for learning the basics. It’ll teach you the basic lingo - repository, commit, branch, pull request, remote, push/pull etc.
But Git is vast. Really VAST.
This means, even after you know the basics, you will stumble upon hurdles as you implement it in your regular workflow. In this article, I want to save you from the common ones so you can skip the frustration and jump straight to the benefits.
We will cover:
How to ensure review from your collaborator before pushing your commits to the main branch
How to merge new changes to your local repository and handle conflicts
How to temporarily stash your work when you don’t want to commit
When should you merge your work with your collaborator - frequently or all at once?
How to ensure review from your collaborator before pushing your commits to the main branch
Here’s the situation -
You have just started using Github to collaborate with your partner on building an MVP for your idea. You’ve added him as a collaborator to the repository.
Now, whenever you have a new commit on your local machine, you just run the following command and push it to your Github repo:
git push origin mainYou push your commit to Github. Your partner pulls it to his local machine.
But when you pushed the last commit, he told you that there was an error in your code. So now, you wish that he would have warned you of this error before you pushed it to the main branch.
You want to create a process so that whenever either of you pushes some code, it gets reviewed by the other person before being merged.
How do you do it?
Never push on the main branch directly
How to create a new branch and push it to Github
When you start working on a new feature, make sure to add all the unstaged changes to a commit in a new branch:
Checkout a new branch from the main branch using the command:
git checkout -b new-branch-name mainMake your changes to the code and commit them using the commands:
git add .
git commit -m "commit message"
Push the changes to the new branch using the command:
git push -u origin new-branch-nameThis will create a new branch called "improve-ui" on the remote repository and set it as the upstream branch for your local branch. After this, you can continue making changes and committing them to the "improve-ui" branch using the same steps as above.
Once, you are ready, go to the repository on GitHub and create a pull request from the new branch to the main branch.
Add your partner as a reviewer to the pull request (available on the right side of the screeen), and then submit it.
Your collaborator will then receive a notification about the new pull request and can review and approve the changes before merging them into the main branch.
Once your partner is done reviewing, he can merge your pull request.
Me: What does -u do in this command?
git push -u origin new-branch-nameChatGPT: The -u option in the git push command is short for --set-upstream. It tells Git to set the upstream branch for the local branch you are pushing, in this case "new-branch-name", to the corresponding branch on the remote repository, in this case "origin/new-branch-name".
Setting the upstream branch allows Git to know which remote branch to use when you run subsequent Git commands, such as git pull or git push, without having to specify the remote and branch name every time. For example, after running git push -u origin new-branch-name, you can simply use git pull or git push without any additional arguments to update your local branch with the latest changes from the remote "new-branch-name" branch or to push your changes back to the remote repository.
Note that the -u option is only needed the first time you push a local branch to a remote repository. After that, Git will remember the upstream branch and you can use git push and git pull without the -u option.
You: What is the difference between "create a merge commit", "rebase and merge" and "squash and merge" options when merging a pull request?
ChatGPT: When merging a pull request, there are three options for how to combine the changes from the pull request with the base branch: "create a merge commit", "rebase and merge", and "squash and merge". Here's a brief explanation of each option:
Create a merge commit: This option creates a new commit that combines the changes from the pull request with the base branch. This commit has two parents: one pointing to the last commit on the base branch and another pointing to the last commit on the pull request branch. This option preserves the entire history of both branches and is useful when you want to keep track of the different development streams.
Rebase and merge: This option first applies the changes from the pull request branch onto the base branch, creating a new linear history that incorporates all changes from both branches. This option is useful when you want to keep a linear history that includes all commits from both the branches.
Squash and merge: This option combines all the changes in the pull request into a single commit and applies that commit to the base branch. This option is useful when you want to maintain a clean commit history and avoid cluttering the base branch with multiple small commits.
Enforce Branch protection rules
The above method of creating a new branch and pushing it to Github is a good practice to follow and nothing more. Any of the collaborators can still decide to push a commit to the main branch without a review. If you want to enforce this rule without fail, Github allows you to set branch protection rules that blocks such commits pushes.
Here's how to set it up:
Go to your repository's settings page and click on the "Branches" tab.
Under the "Branch protection rules" section, click the "Add rule" button.
In the "Branch name pattern" field, enter the name of the branch you want to protect. For example, if you want to protect the main branch, enter "main".
Check the "Require pull request reviews before merging" option.
Optionally, you can also check the "Dismiss stale pull request approvals when new commits are pushed" option to keep the pull request up-to-date with the latest changes.
Click "Create" to save the branch protection rule.
From now on, any push to the protected branch will require a pull request to be created, which must be approved by the other collaborator before merging into the protected branch.
Note that if you want to push changes directly to the protected branch without creating a pull request, you will need to temporarily disable the branch protection rule. Also, as of this writing, Branch protection is a premium feature of Github.
How to merge new changes to your local repository and handle conflicts
You learnt above how to push your local branch to the remote repository and create a pull request to merge it into the main branch. That’s a simple process. But things get messy if your collaborator has made any new commits to the main branch of the remote repository since you last pulled from it.
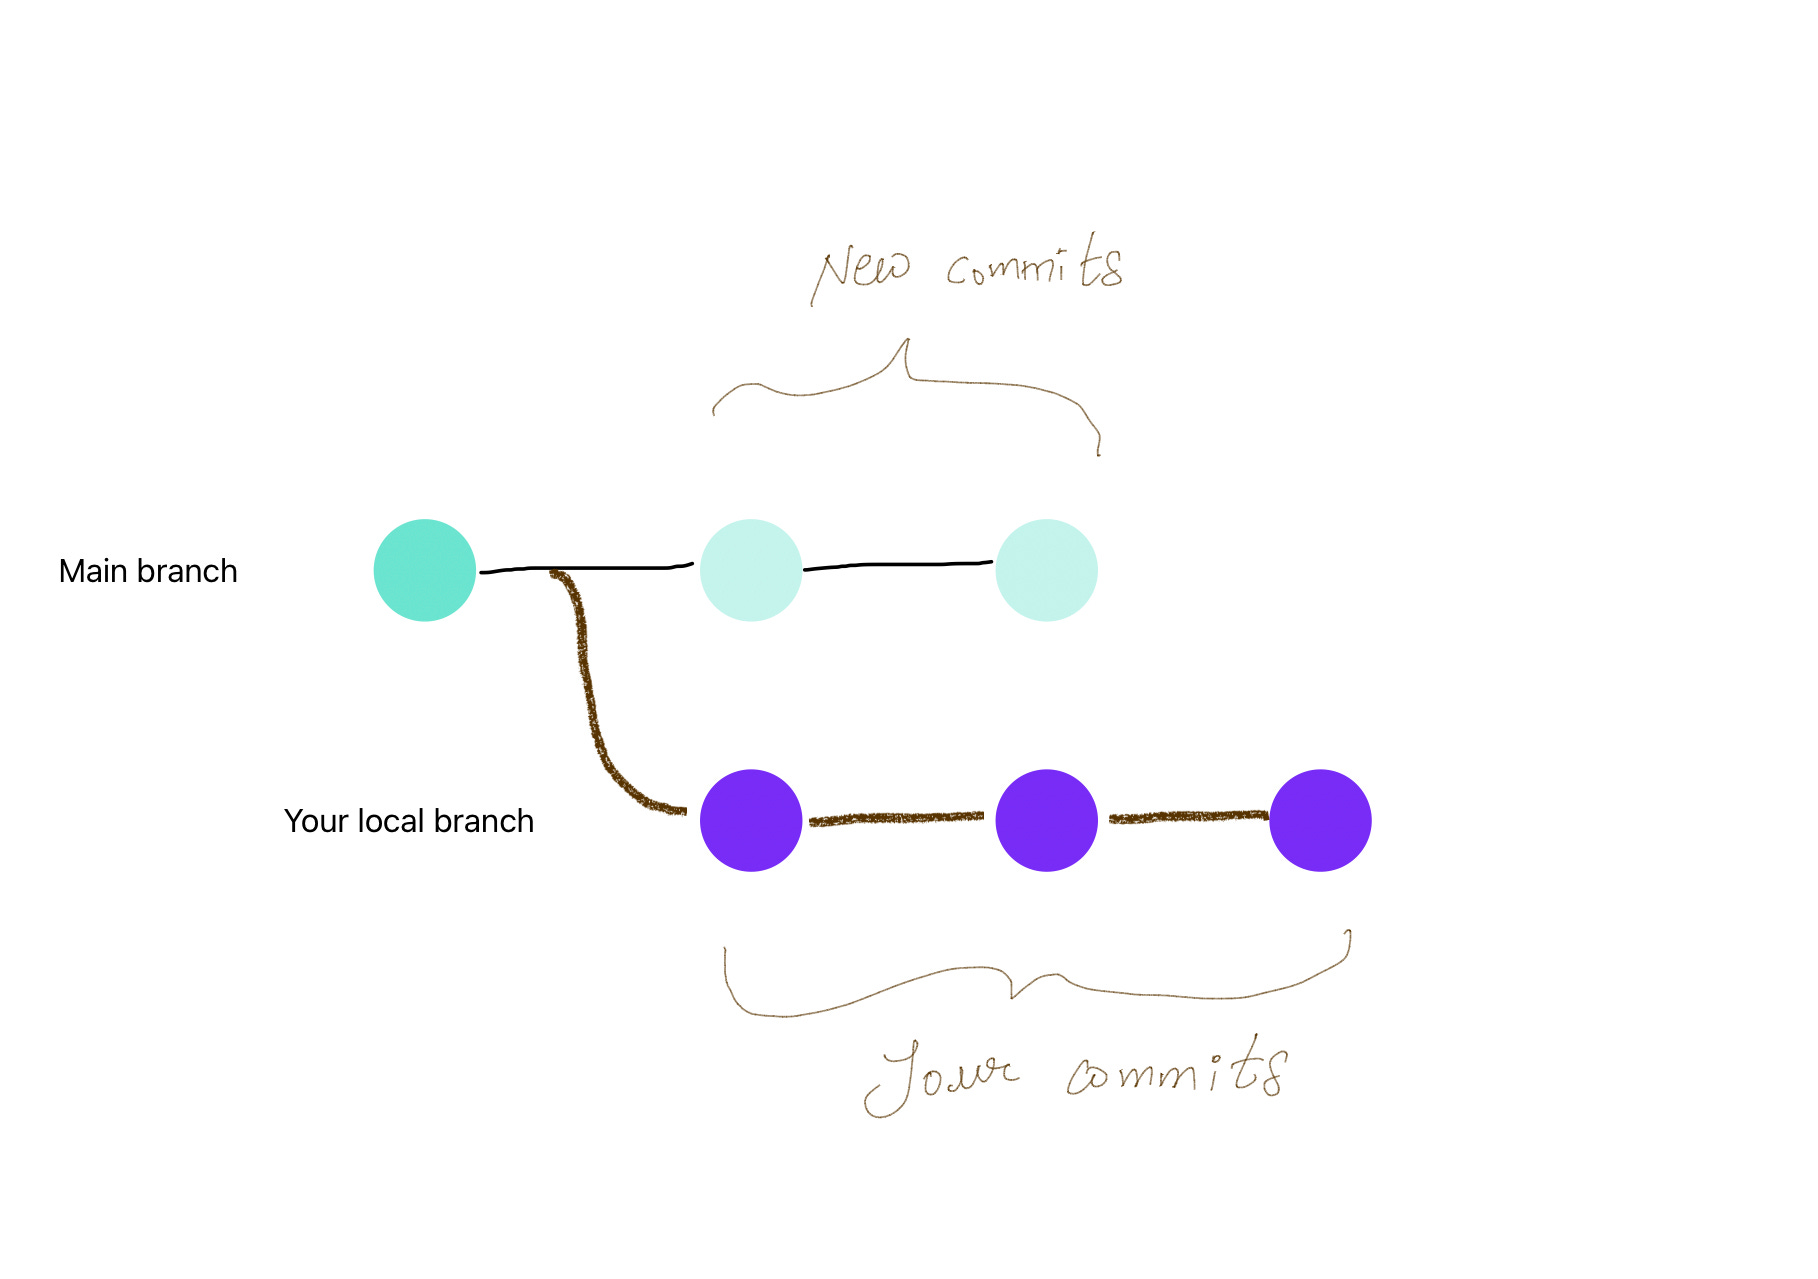
This scenario results in “conflicts” that need to be resolved before you can merge your changes into the main branch. imagine the case when both of you have changed the same file in your commits. You don’t want to lose any of your changes.
Resolving conflicts is simply the process of making sure that both your changes and the changes that your collaborator added, can co-exist together.
Since your collaborator has already pushed his changes to the main branch of the remote repo, you will need to do the work of resolving conflicts before you push to the main branch. So, you will essentially go to each of the files where you both have made changes and edit them to make sure that they are working in a way that you both want.
Git merge vs. Git rebase
This resolution can take 2 shapes:
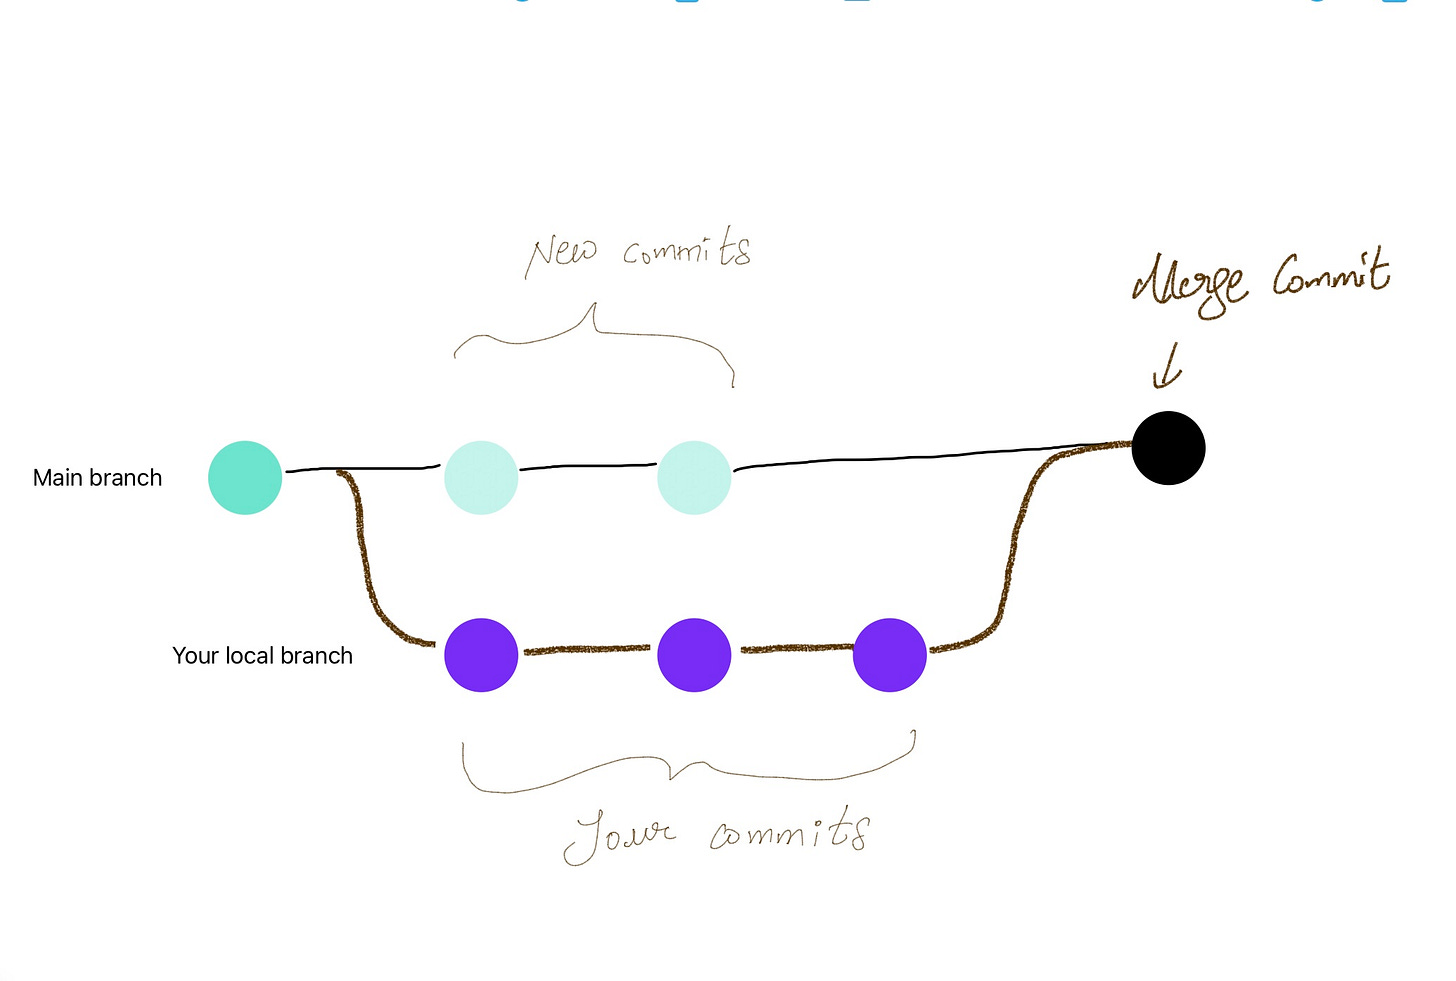
You can add a new “merge commit” to the main branch that signifies that you have done the work of resolving the conflicts. This is called Git Merge.
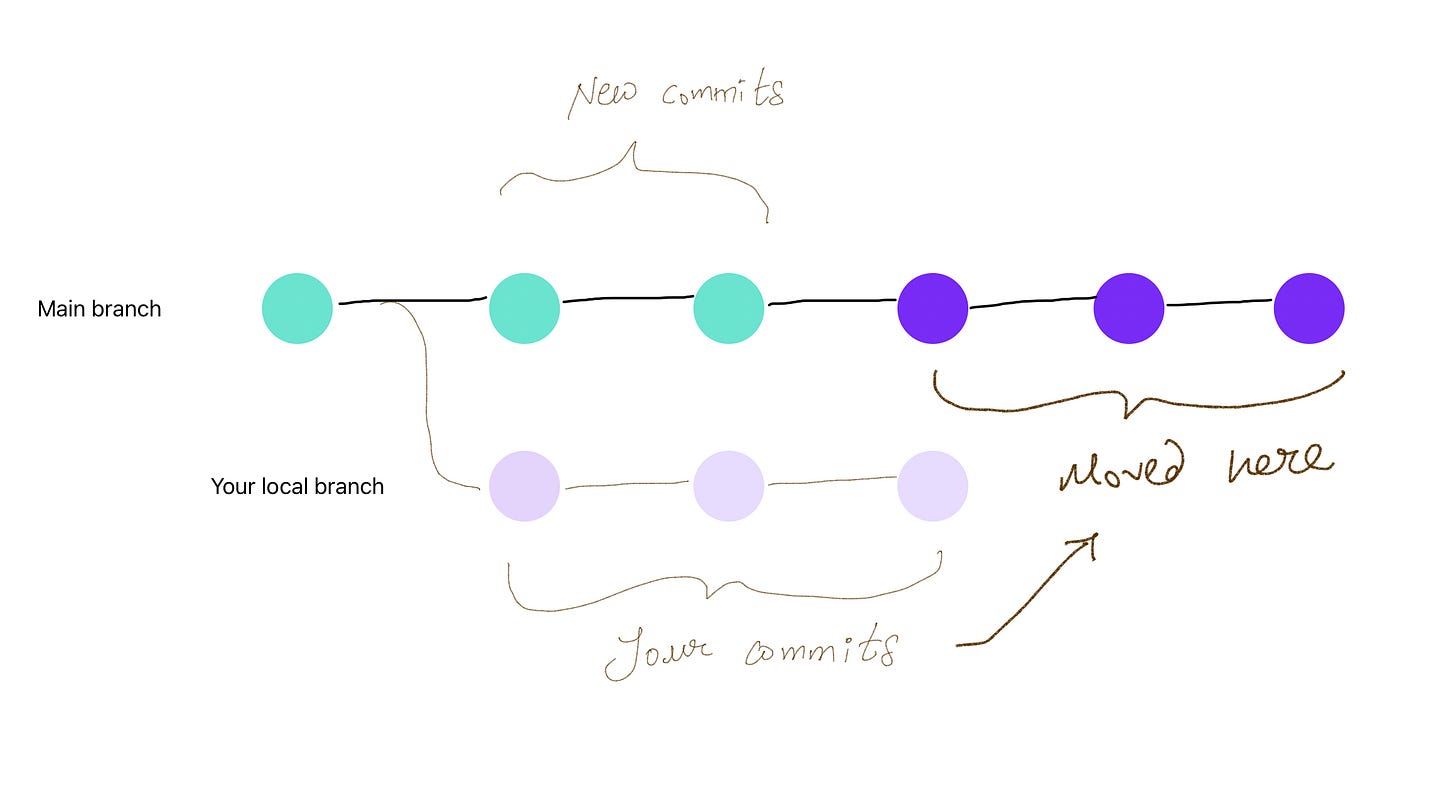
Or, you can move your commits in front of the latest commit that your collaborator has added, so it appears as if you've been working off the latest main branch. This is called Git Rebase.
I like Git Rebase over Git Merge because it results in a clean project history. What do I mean by that?
Check out the commit history of our project when we used Git Merge. See those commits in red? They are hard to decipher and don’t even convey much information.
When we use Git Rebase, we don’t get these “merge” commits. It appears that everyone has always been off of the latest commit in the main branch. For a more detailed discussion between the 2 options, check out this and this.

How to git rebase?
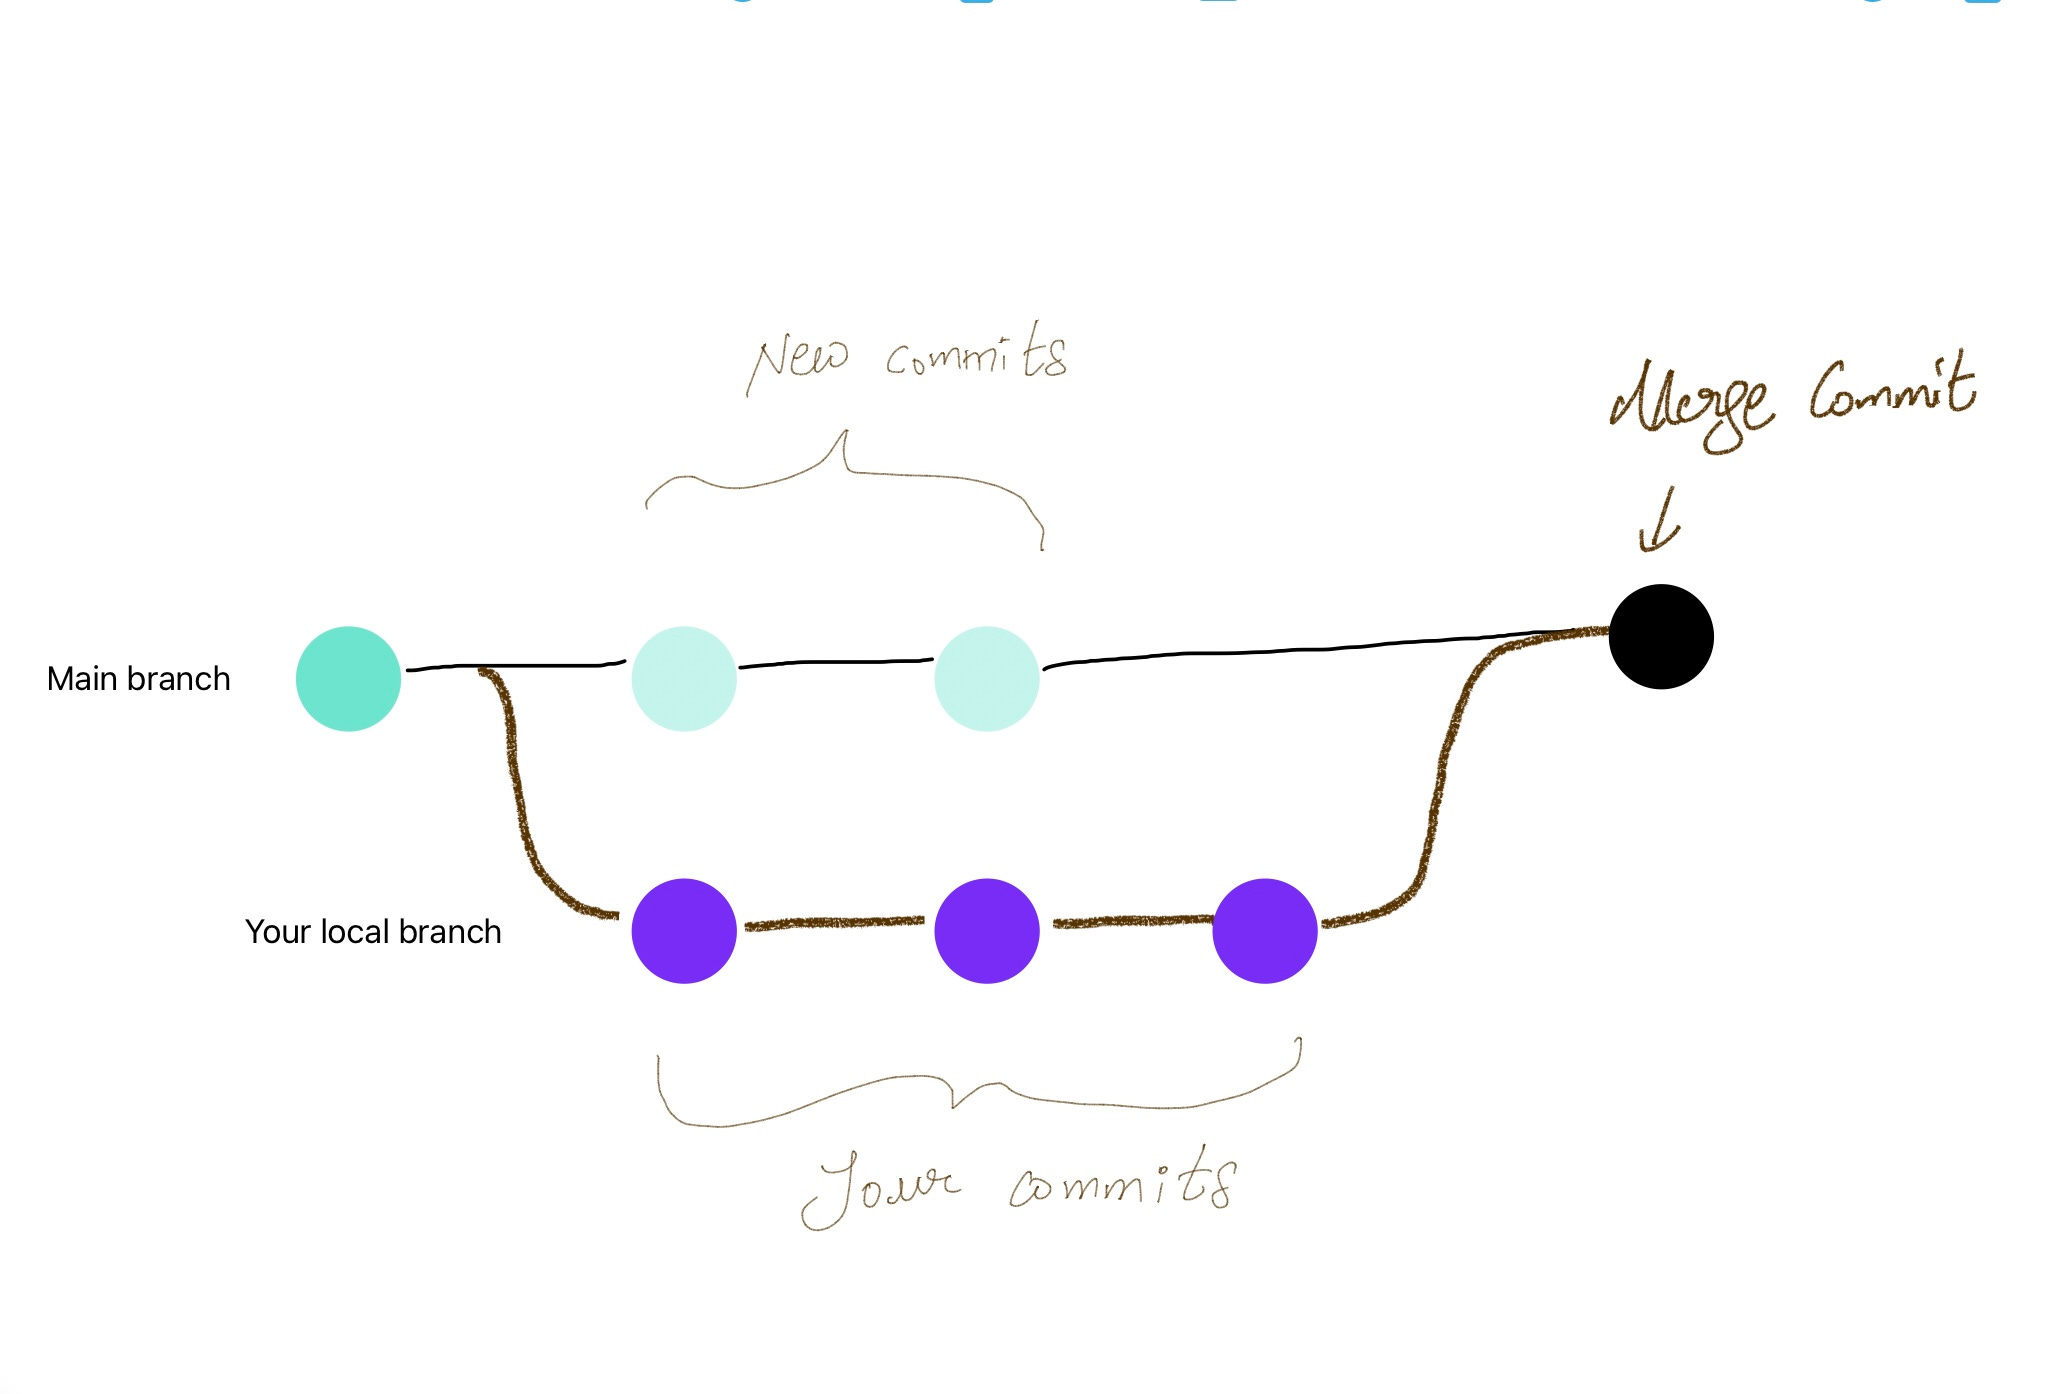
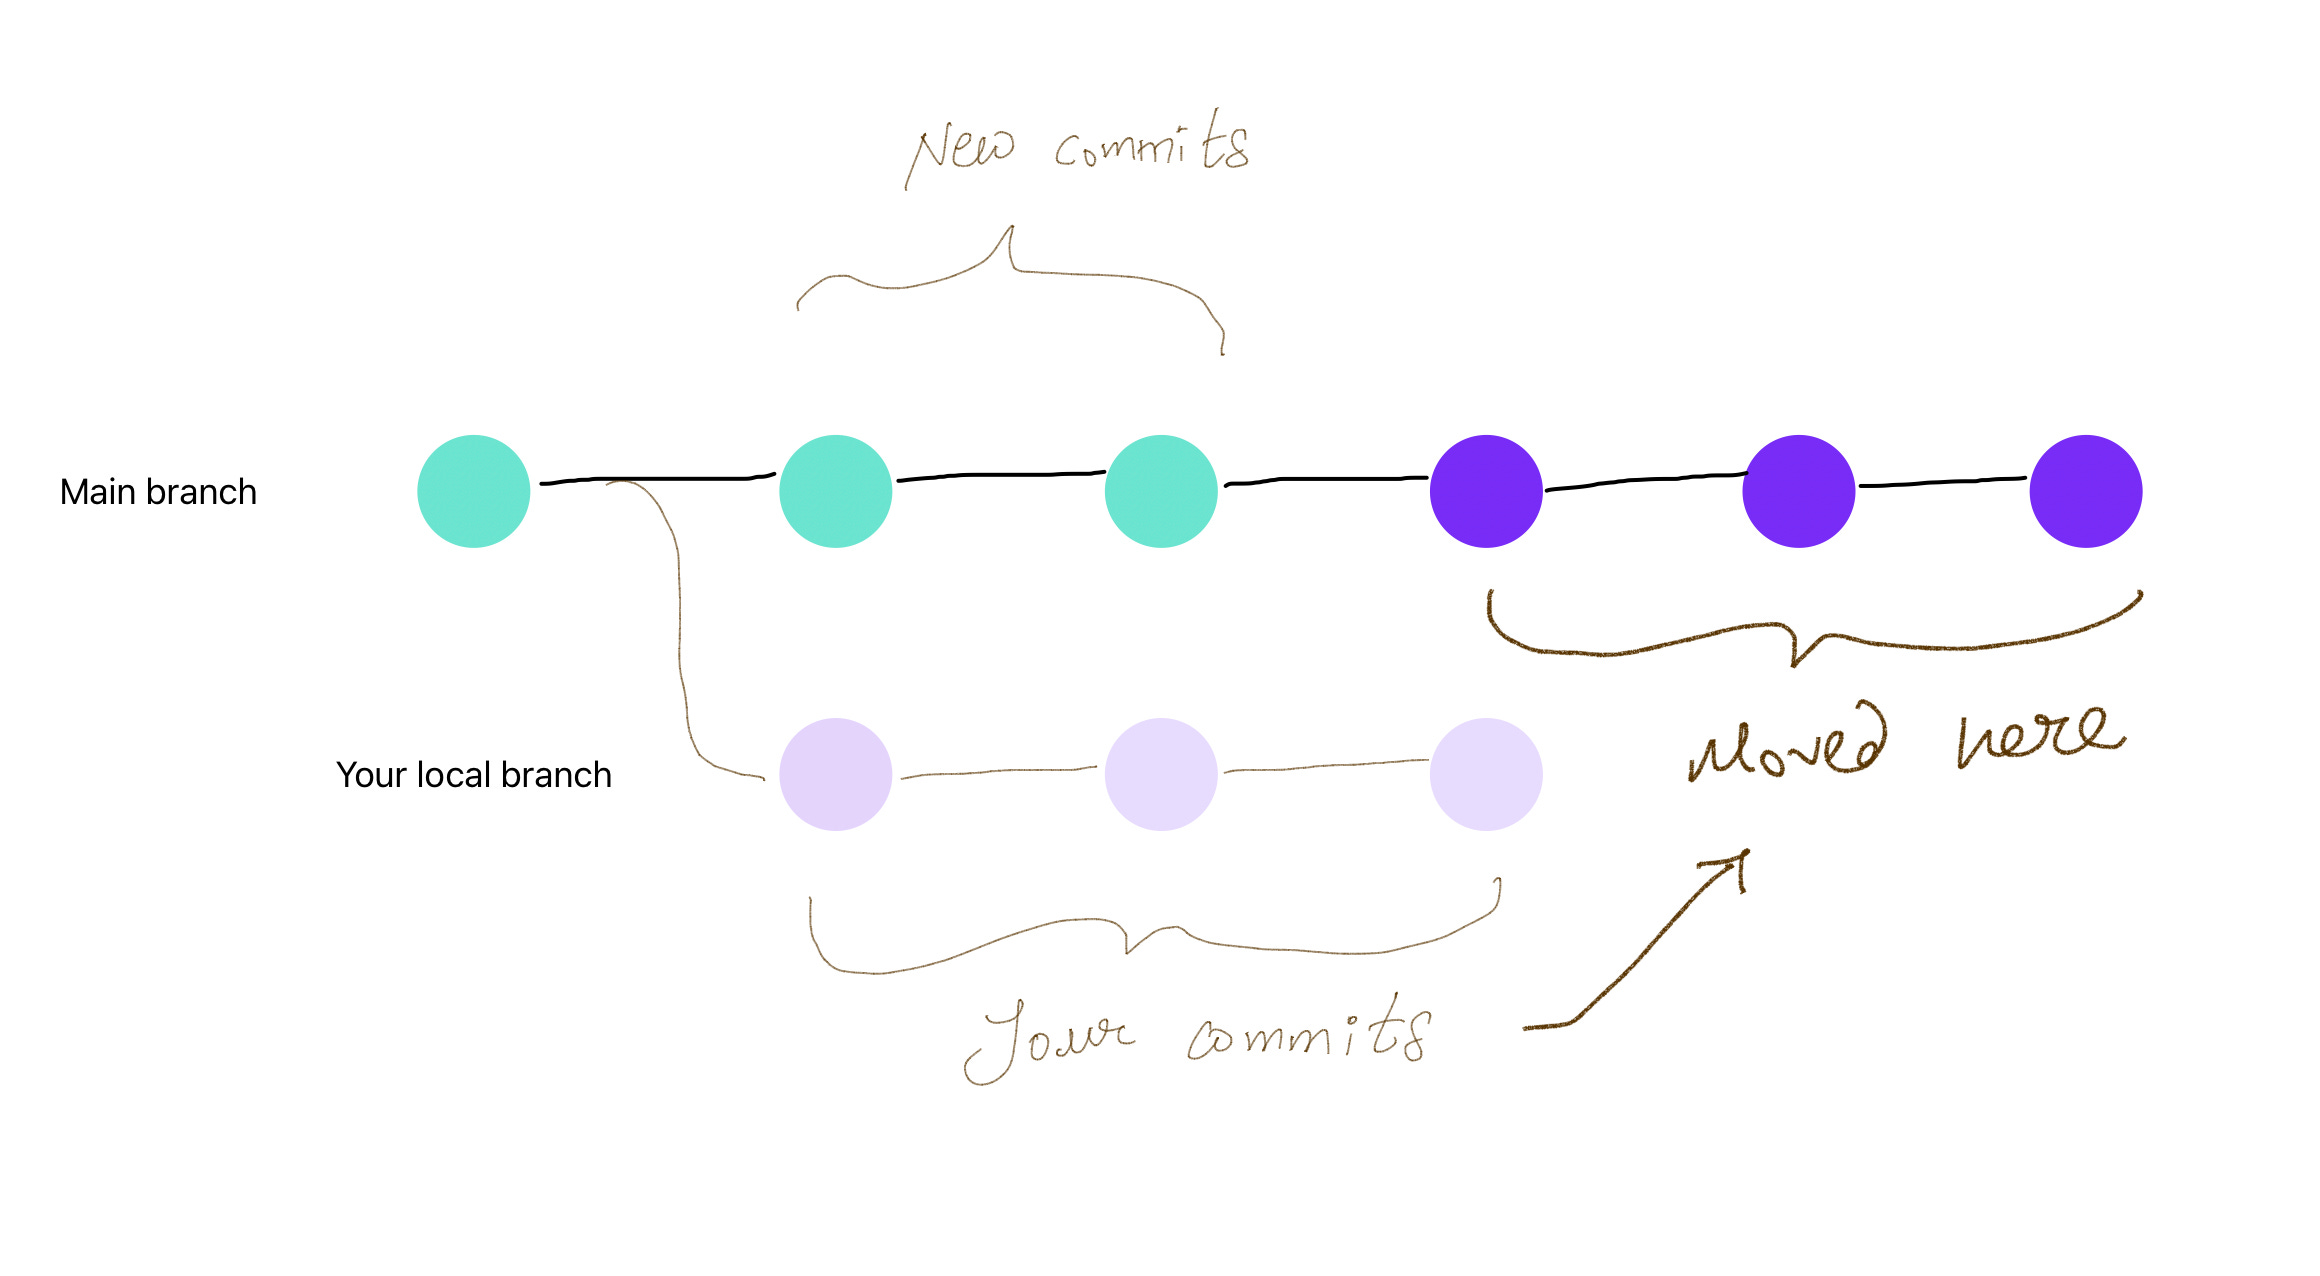
Say you’re on a local branch called feature-prompts that is 3 commits ahead of the main branch on your local machine. Also, the main branch of the remote repository has 2 commits that are not there on your local main branch. Just like shown in the visual above.
Here’s how you can pull the changes from the remote main branch and rebase your feature-prompts branch:
First, ensure you have committed or stashed any pending changes on your current branch to avoid conflicts.
Switch to the main branch on your local repository:
git checkout mainPull the latest changes from the remote main branch:
git pull origin mainThis will update your local main branch with the 2 new commits from the remote repository.
Switch back to the feature-prompts branch:
git checkout feature-promptsRebase your feature-prompts branch on top of the updated main branch:
git rebase mainThis command will apply your 3 commits on top of the updated main branch, as if you had made your changes after the 2 new commits.
If you encounter any conflicts during the rebase, you will need to resolve them manually. Edit the conflicting files to resolve the differences, then stage the resolved files using
git add <file>. After resolving all conflicts, continue the rebase with:
git rebase --continueRepeat this process until all conflicts are resolved and the rebase is complete.
Once the rebase is done, your feature-prompts branch will be 3 commits ahead of the updated main branch, and it will include the 2 new commits from the remote repository.
Note: If you have already pushed the feature-prompts branch to the remote repository before rebasing, you will need to force-push the rebased branch with:
git push -f origin feature-promptsGood practices for structuring a commit message
Me: What are some good ways to structure a git commit message? Can you explain by giving examples.
ChatGPT: Yes, here are some guidelines for structuring a good Git commit message:
First line should be no more than 50 characters and should not end with a period: It should be a brief summary of the changes made in the commit. The rest of the message should provide more details about the changes made.
Use the imperative mood: The subject of the commit message should be written in the imperative mood. This means that it should be written as a command that describes what the commit does, rather than a description of what was done. For example, "Add feature" is better than "Added feature".
Here are some examples of well-structured Git commit message subject lines:
Add new feature to search functionality
Fix bug in user registration form validation
Refactor code for better performance
Implement authentication using OAuth 2.0
Update documentation for REST API endpoints
Use a consistent format: Use a consistent format for all commit messages in the repository. This can include things like capitalization, punctuation, and the use of abbreviations or acronyms.
Reference relevant issues: If the commit addresses an issue or task, include a reference to it in the commit message. For example, "Fix bug #123" or "Implement feature #456".
Keep it concise: Keep the commit message concise and to the point. Avoid including unnecessary details or background information.
How to temporarily stash your work when you don’t want to commit
Imagine a scenario when you are working on a new feature on your feature branch and your collaborator asks your to check out a change that he push on a different branch. In order to take his changes out for a spin, you will need to switch to a different branch using git checkout. But as soon as you do that, you see an error like this:
error: Your local changes to the following files would be overwritten by checkout:
        app/controllers/signups_controller.rb
Please commit your changes or stash them before you switch branches.
Aborting
In these cases, you have 2 options:
You can add your changes using
git addand commit them usinggit commit.Then, Git will allow you to checkout to a different branch.But what if you aren’t ready to commit? Maybe you don’t know if you’ll need a new commit or if you want to edit the last one. In situations like these you can temporarily stash your changes using
git stash.
Simply enter:
git stashThis will save your changes to a temporary stash and allow you to checkout to a different branch. Once you are ready to come back, you can unstash your changes by pressing:
git stash applyThis will apply the changes that you’ve stashed.
You can also have multiple items in the stash. To see a list of all items in the stash, run git stash list. This will show you the a list of all stashes you have saved.
stash@{0}: WIP on feature-branch: 7a8e6b4 Added new feature
stash@{1}: WIP on master: 4c33101 Fixed bug in homepage
In order to delete your stash list, you git stash drop command. This will drop the last item you saved to the stash.
Should you delete your branches
Me: Should i remove my local branch in git after it has been merged to main?
ChatGPT: After a branch has been merged into the main branch and you no longer need it, it's generally a good practice to delete the local branch. This helps keep your repository clean and organized and avoids cluttering your branch list with unnecessary branches.
Me: How to remove a branch in git locally?
ChatGPT: To delete a local branch in Git, you can use the following command:
git branch -d branch_name Replace "branch_name" with the name of the branch you want to delete. Note that this command will only work if the branch has already been merged into the current branch. If the branch has not been merged yet, you can use the following command to force delete the branch:
git branch -D branch_name Be careful when using the -D option, as it can cause you to lose work if you accidentally delete an unmerged branch. Always make sure you have committed and pushed any changes you want to keep before deleting a branch.
Note that deleting a local branch does not delete the corresponding branch on the remote repository. To delete the remote branch, you can use the following command:
git push origin --delete branch_name This will delete the "branch_name" branch on the remote "origin" repository.
---
When should you merge your work with your collaborator - frequently or all at once?
Imagine a scenario where you and your partner are both working on 2 different features. They are both big features that require lots of commits. They also require you both to be working with the same set of files.
So, the question is, at what stage should you merge? You have 2 options:
Frequently - both of you keep pushing your changes, pull them and resolving the conflicts after every few commits
All at once - in order to remove the headache of dealing with conflicts, you can decide to perform the merge all at once after you have both finished work on your features.
Which one should you choose?
ChatGPT: The decision of when to merge your branches depends on your development workflow and the level of collaboration between you and your collaborator. Here are some factors to consider:
Compatibility: If your two features are independent and don't overlap, you may be able to merge your branches independently without any conflicts. In this case, you can merge your branches whenever you're ready, without worrying about disrupting each other's work.
Dependencies: If your two features are dependent on each other, or if they modify the same files, you may need to coordinate your merges more carefully. In this case, you may want to merge your branches frequently to avoid conflicts and ensure that your changes integrate smoothly.
Development speed: If you and your collaborator are making rapid progress on your respective features, you may want to merge your branches frequently to keep up with each other's changes and avoid getting too far out of sync.
Since you’re both working on the same set of files, it will be a good idea to merge your branches frequently. This can help you avoid conflicts and ensure that your changes integrate smoothly.
However, if your features were relatively independent, or if you were working at a slower pace, it may have be fine to wait until you're both done with your features before merging your branches. This can give you more time to focus on your respective features without worrying about disrupting each other's work.
Final piece of advice: use ChatGPT.
As a new Rails developer, you shouldn’t be spending time learning the ins and outs of Git. Your time will be better spent coding and learning Rails. So just learn the basics of Git and use ChatGPT whenever you are stuck. I used ChatGPT to teach me almost everything that I’ve mentioned in this article above.